javascript:reassign('tab_applications') javascript:reassign('tab_folders') javascript:reassign('tab_graphics') javascript:reassign('tab_internet') javascript:reassign('tab_organizer') javascript:reassign('tab_scripting') javascript:reassign('tab_servertools') javascript:reassign('tab_utilities') Introduction | Adding Tabs | Building the Launcher | Example Launcher | Tips & Suggestions | What Next?

The Power of the MacOS Launcher

By far the most underappreciated feature of the classic MacOS is the Launcher. The Launcher gives you instant access to almost anything in the world and is fully configurable by any Mac user who wants to spend a few minutes learning how.

You will find the Launcher in the Control Panels folder (accessible thru the Apple Menu).

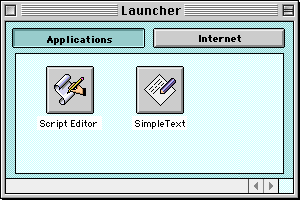
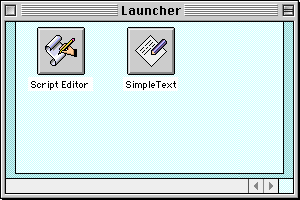
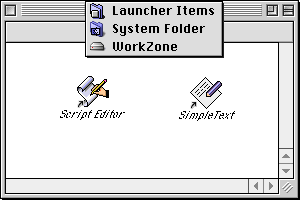
When you start the Launcher, you will probably see a colored window with 2 "buttons," one for the Script Editor, and another for SimpleText.


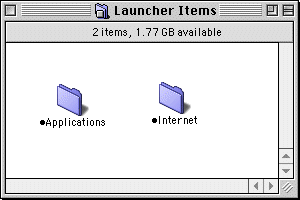
Open up your System Folder. In it you will find the "Launcher Items" folder. Open it. I've taken the screen shot while holding down the command key (open Apple, next to the space bar) while clicking on the window's title bar (and scooting the mouse out of the way), to show the enclosing folders.


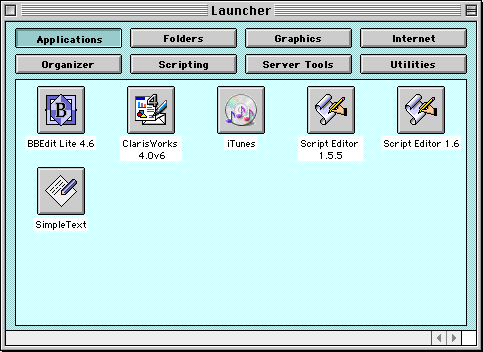
You should quickly realize that the buttons displayed in the Launcher are the same as the aliases in the Launcher Items folder. The Launcher is simply an application which lets you look at a Folder in a special way.
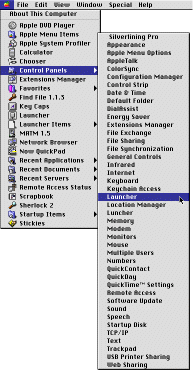
Top of Page

Making the Launcher "tabbed"


Open the Launcher Items folder. Create a new folder inside it. Give your new folder a name like "". Very Important: That first character is a bullet, generated on the Mac by typing [option-8]. Create another folder and name it "[option-8]Applications" (don't get literal on me here). Put the aliases of Script Editor and SimpleText inside this "Applications" folder.


Open the Launcher again. You should see that it now has 2 tabs, corresponding to the 2 folders you just created. Click on the tabs (this is great when sound effects are turned on). You should see Script Editor and SimpleText when you click on the "Applications" tab. The Internet tab, no surprise, is empty.
Top of Page

Building the Launcher

You can have up to 8 "dotted" or "tabbed" folders inside the Launcher Items folder. Name them as you wish. Some suggested folder names would be "[option-8]Folders", "[option-8]Utilities", "[option-8]Graphics", "[option-8]Scripting", "[option-8]Organizer", "[option-8]Tools", "[option-8]John", "[option-8]URLs", or "[option-8]Games". The choices are yours.

To add items to the Launcher, select the tab for the category you want and drag an item (folder, file, application, text clipping - any Finder item) from a Finder window into the Launcher. Some jockeying of windows may be necessary to accomplish this. Alternatively, you can put aliases into the appropriate subfolder within the Launcher Items folder. (Hint: Hold down [option]-[command] while dragging a Finder item to quickly create an alias.)

To remove items, you can either [option]-drag them out of the Launcher (and to the Trash), or delete them from the Launcher Items subfolders ([command]-delete is a quick way to trash something).

Top of Page

Example

Here's a functional screen shot of my own Launcher. If my Javascript is right, you should be able to click on the tabs to switch views, simulating my actual Launcher. My Launcher is a perpetual work in progress; this is its status as of january 30, 2002:


As you can see, one can easily place many dozens of items in the Launcher.
Top of Page

Some Tips to Make the Launcher More Useful

  1. Put the Launcher Items folder itself under the "Folders" tab. This way, you always have quick access for editing.
  2. On MacOS 9.x, use the Keyboard control panel to map a function key (I use F12) to the Launcher. This way, the Launcher is always a keystroke away.
  3. Put an alias to the Launcher in the Apple Menu. Add a [space] character at the beginning of the alias' name so that it shows up high in the menu. Don't put it in a subfolder; in case you need to start with extensions off, you will still have access to your Launcher.
  4. Put an alias to the Launcher Items folder in the Apple Menu. Now you have hierarchichal access to everything in the Launcher without using the Launcher. Do what works for you!
  5. Add a folder named "Droplets" (do not use [option-8] for this one). Open the folder, set it to list view, and drag it down to the bottom of your screen to make it a pop-up folder. Put aliases to BBEdit, Stuffit Expander, DropStuff, PictureViewer, etc. in it. Now you have immediate access for dragging and dropping various files. The droplets folder could live anywhere, but the Launcher Items folder is so, well, sensible.
  6. If you outgrow the Launcher (and I'd like to meet the man or woman who does), create a folder, set it to button view, fill it with whatever, and drop it into the Launcher. You now have a way to make the Launcher arbitrarily deep.

Top of Page

What Next?

I plan to demonstrate the following power techniques in the near future:

Top of Page