This is a legacy page and remains here for historical reference.
Configuring VirtualPC for IPNetRouter
AKA "Configuring Windows95/98 for Internet Access over a Local Area Network (LAN)"
Here's the scoop on configuring Windows9x under VirtualPC (hereafter VPC) to access the Internet via an IPNetRouter gateway. More generically, this page will discuss connecting a Windows9x machine to the Internet thru any LAN with any router (firewalls may be problematic). A few disclaimers:- I am not a Windows or network guru by a long shot. If anything I have is wrong, incomplete, or misleading, please let me know.
- I make no guarantees that this will work for you.
- VPC may not be able to run on the same Mac as IPNR (details here).
- I make no guarantee this will not trash Windows. Of course, since you're smart enough to be running Windows on a Mac, you can simply make a backup copy of your PC hard drive image before beginning.
(I suggest you read straight thru this page first, then use the links below as a reference index.)
- Start VPC
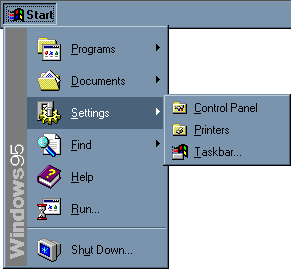
- Open the "Network" Control Panel
- Look for the PCI DECchip 21041 Based Adapter
- Add the Adapter (if necessary)
- Add the Protocol
- Bind the Adapter to the Protocol
- Set the TCP/IP Properties
- ........Enable DNS
- ........Router (Gateway) IP address
- ........Disable WINS Resolution
- ........VPC IP address
- Open the "Internet" Control Panel
- Set the connection to local area network.
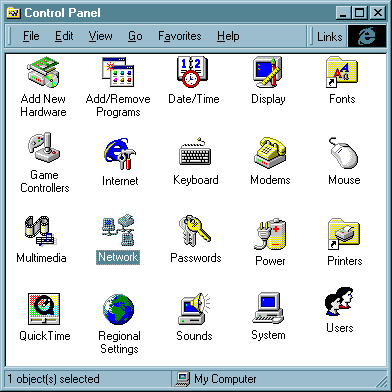
1. Start VPC. Open the Control Panel via the Start menu.
Side note: I moved the Start Menu to the top to make it more Mac-like.
top
2. Open the "Network" Control Panel.
top
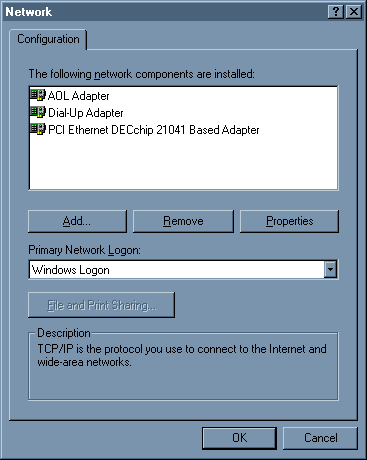
3. This is the Network Control Panel window. You may have many more items showing. Look for this one:
If you find it, skip to here.
If not, look for this one:
If you find it, skip to here.
If you don't see either of them, click the
top
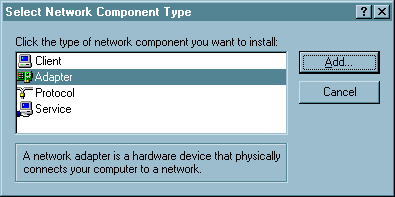 4a. If you don't have the PCI DECchip 21041
Based Adapter, select "Adapter" and click
4a. If you don't have the PCI DECchip 21041
Based Adapter, select "Adapter" and click
NOTE: This step assumes VPC. If you have a hardware PC, your ethernet card may be different. You're On Your Own for this step.
top
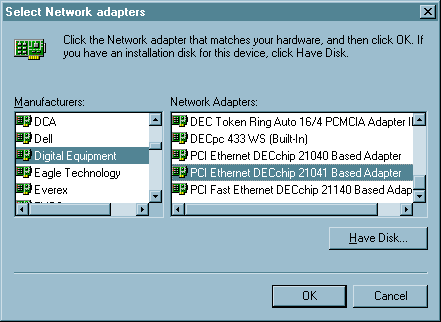
4b. Select "Digital Equipment" in the left column, then "PCI Ethernet DECchip 21041 Based Adapter" in the right hand column. Click
top

5a. You're back to this window. Now that you have the DECchip 21041 adapter installed, select "Protocol" and click
top
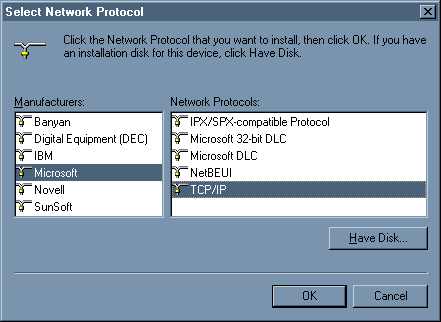
5b. Hold your nose, select "Microsoft" in the left column, then "TCP/IP" in the right. Then click
top
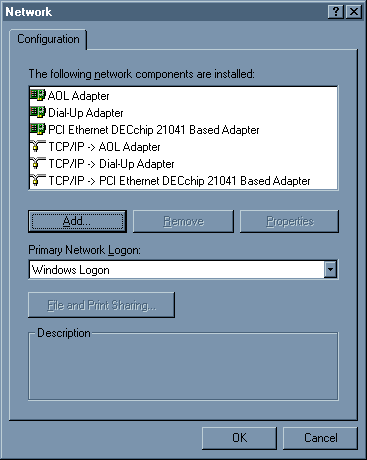
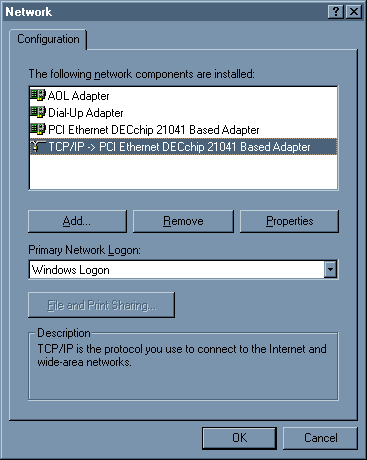
5c. You will notice that there is now a TCP/IP protocol for every adapter. You want this one
but there's one other setting to check before you work with it. Read on...
You may be able to delete the others, but you do so at your own risk.
top
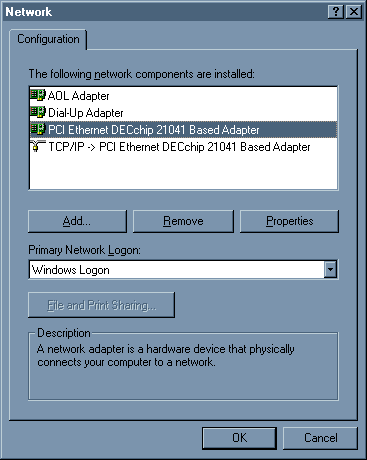
6. Click on
then click
Be careful what you click! You must select the adapter itself, not its protocol, for this step!
top
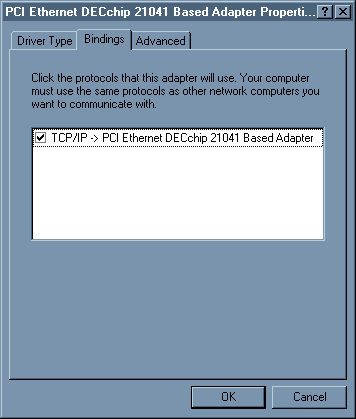
6b. Select the |Bindings| tab, make sure the box shown is checked, then click
top
7. Select
then click
Yeah, Windows is just like a Mac. Sure.
top
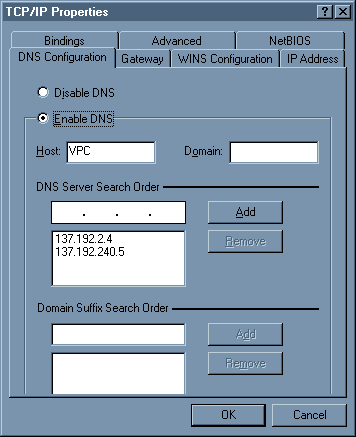
8. Click the
Here are some domain name server addresses for you if you need them:
137.192.240.5 ns.mr.net (nic.mr.net) 137.192.2.4 ns2.mr.net (nic2.mr.net) |
top
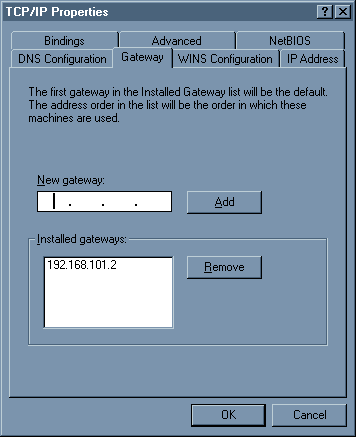
9. Click the
Mine is shown by way of example.
top
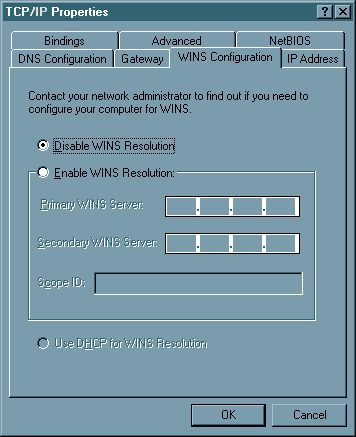
10. Click the
top
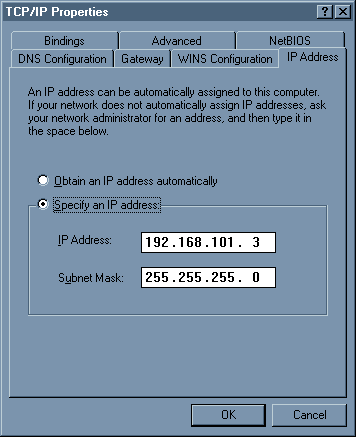
11. Click the
I don't believe any of the other tabs are necessary for our purposes. You may want to click thru them to be sure, since everyone's setup is different.
When you're done, click
top
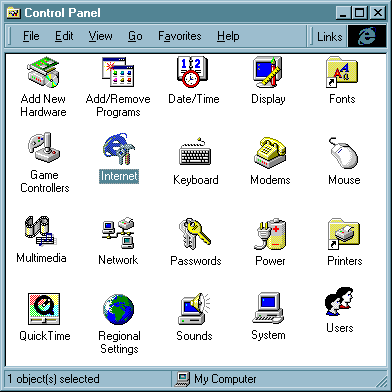
12. Open the "Internet" control Panel.
| Your icon may look like this: |
top
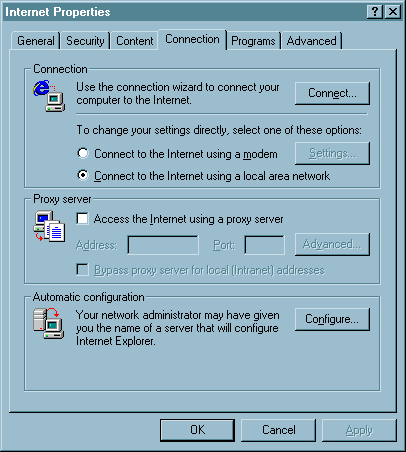
13. Click the
Click
That should do it. I have used these steps to configure several actual Wintel machines, the only difference being in the adapter - the actual ethernet card installed in the machine, and this has not been too hard to figure out. I would like to hear from anyone who puts this information to good use. My e-mail address is jwbaumann(shift-2)linkedresources(dot)com (Jeffrey W Baumann). If you have questions/problems, posting to the NetTalk Mailing List is probably the better way to go.
Visit my Configuring IPNetRouter pages!
Why won't VPC and IPNR run on the same Mac?
This is the most common question I get, so here's the answer as best I understand it. I have received many reports that this no longer applies with newer versions of Virtual PC and MacOS 9, and no feedback regarding MacOS X. I have not personally verified any of this because, quite frankly, I'm not that interested anymore (why even bother with Windows when we have MacOS X?). Your mileage may vary.MacOS uses Open Transport (OT) to handle TCP/IP communications. IPNR uses OT. VPC bypasses OT and uses its own protocol. If OT/IPNR and VPC try to share the same ethernet port, they conflict - they don't play nice together.Last Updated April 19, 2019 (cosmetic update mostly)
If you have a separate ethernet card in your Mac for IPNR, and VPC uses the built in port exclusively, and IPNR is configured for single ethernet with the ethernet card, you can run them together, but wouldn't you want the speed and safety of a dual ethernet arrangement? In that case, you would need a third ethernet card. But since the cable modem/ADSL folks have probably already configured your Mac to the built-in ethernet by the time you think to do this, and VPC is kind of "hard-wired" to the built-in port too, you're opening the door to all sorts of nuisance problems trying to set this up.
Additionally, the vast majority of IPNR users have 2 or more Macs. You usually want IPNR on the slower/slowest Mac (IPNR doesn't ask much of the processer), and VPC on the fastest (VPC loves MHz), so running them together (for most people) is a little inefficient.
©1999-2019 Jeffrey W Baumann & LinkedResources. All Rights Reserved.


© 1997-2022 Jeffrey W Baumann dba LinkedResources. All Rights Reserved. Last Updated December 28, 2021.